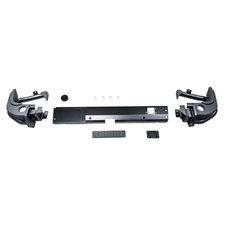
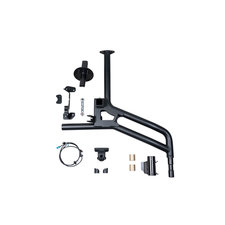
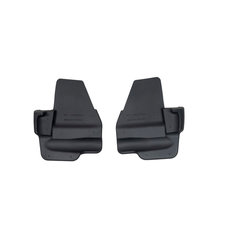
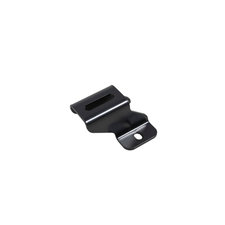
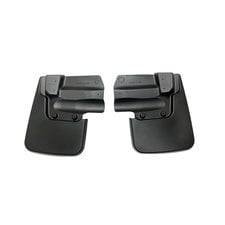
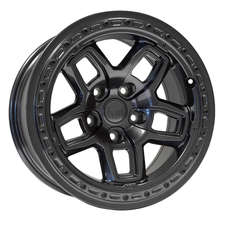
hey Rob here for Quadratec.com today we've got Matt's three liter eco diesel back in the shop for an AEV rear bumper and tire carrier now if you're not caught up on Matt's build up of his Rubicon you can click the info button to watch the past couple videos that we've been putting together over the past few weeks covering everything from suspension to wheels and tires some differential protection front bumper and recovery now with the installation of Matt's new rear bumper that'll round out the transformation of his Rubicon from a run-of-the-mill jeep to a vehicle ready to tackle everything from daily driving to weekend rock crawling and even longer overland trips now just like we saw with AEV’s RX front bumper the AEV rear bumper is a modular style construction the great thing about that means you're not lifting one big heavy bumper up onto the back of the jeep especially if you're completing this install by yourself it's going to make your job a whole lot easier start by installing each of the end components followed by the center section and last the tire carrier but before we dive into all the great features of the bumper why don't we go ahead and get some of it installed on the back of mats jeep at this point we've got both end brackets installed along with our driver side end cap we can go ahead and finish that up by installing that plug i also went ahead and set the center section of the bumper in place so you can see what the bumper would look like if you're not using the RX tire carrier now because of how high this bumper does sit especially through the center section it's worth noting that you will not be able to run a factory spare tire or a larger spare tire using the factory bracket it will cause some interference with the bumper now you have two choices there you can either choose to completely delete your spare tire carrier from the tailgate and not carry a spare back here or if you do want to use the factory spare tire carrier you're going to need a relocation kit to move that bracket up and away from the back of the vehicle to give you the clearance you need for that oversized or factory size spare tire now with that being said doing so is going to add a lot of weight and stress here to the tailgate so the better solution is to go with the RX tire carrier which is going to transfer that load instead of here at the tailgate down here to the side of the frame rail i already went ahead and installed the spindle mount here on the passenger side of the bumper next we need to go ahead and remove the factory spare tire carrier from the tailgate so we can install the body side brackets for the tire carrier then we can temporarily install the spare tire carrier into the spindle mount so that we can get everything correctly aligned and once we have all the bolts torqued we're going to go ahead and remove the spare tire carrier back from the mount so that we can complete the installation of the passenger side end cap along with the center section of the bumper at that point we can go ahead and permanently install the spare tire carrier into the carrier mount and then install the fender flare extensions after installing the extended wiring harness for the backup camera and third brake light into the tailgate we can route it through the tailgate side bracket and then install the wheel mount here into our tire carrier finally we can route that wiring down through the wheel mount and out the back side one of the things i really like here with the RX tire carrier is how AEV is reusing your factory backup camera they're keeping it in a very factory-like position here at the center of the spare tire so that your visibility is not going to be affected by that oversized spare tire and by using that factory backup camera well you're going to get the best quality picture on your display now to get the camera mounted into the RX tire carrier we'll place that factory camera here into the cradle provided by AEV it simply snaps right into place there and then we can plug in the camera harness to the back side of the camera and feed it right in to the back side of the wheel mount it's going to slip right in push it in until it snaps right into place there for a very finished factory looking camera mount and camera placement now the wheel mount on the RX tire carrier has a five on five bolt pattern already set up for you and it does feature a lot of adjustability in and out so that it will accommodate wheels with different backspacing it's going to work perfectly with your factory wheels or AEV wheels of course or many other wheels that are available on the aftermarket at this point i'm going to go ahead and get our wheel mount set up to the proper distance for Matt's wheel and tire combination and then we can go ahead and get that turnbuckle installed between the spare tire carrier and the tailgate so that everything opens in unison with one seamless motion at that point we're going to be pretty much finished up with our install we can go ahead and get Matt's new spare mounted up here on the tire carrier the last thing to complete our install is to go ahead and install the backup camera trim piece along with the third brake light now AEV is reusing the factory third brake light we simply remove from the factory spare tire carrier trim off a couple alignment tabs and then secure it to the new AEV trim piece with the factory hardware we can go ahead and grab that wiring that we tucked up into the wheel mount a little bit earlier we're simply going to plug that into the third brake light here tuck the wiring up so it doesn't interfere with anything and then we can slide that trim piece right onto the wheel mount and you just want to make sure you push that all the way on until both of those tabs lock into place securing that third brake light in place here on the wheel carrier now with that i want to move on to some of the great features of the AEV rear bumper before we wrap up today's video of course if we move around to the side here you can see the tube work on the side profile of the AEV rear bumper is cut up nice and high which is going to give us some really great departure angles when we're out on the trail of course we've got those fender flare extensions which are going to help to protect that rear bumper from items that are kicked up from the road in the trail if you do want to add some additional protection you can purchase the AEV rear splash guards available separately and speaking of items that are being kicked up from the road and the trail contacting our rear bumper here of course AEV not only e-coats and powder coats this rear bumper but they also add a zinc coating first to add an additional layer of corrosion protection which is especially important for something like a rear bumper which is going to be susceptible to a lot more junk being kicked up from the road or the trail now if we make our way around here of course we've got two heavy duty recovery points one on each side of the bumper that will accept a d-ring or bow style shackle as we move in you see we do have a provision to add a three inch cube light if you want a little extra light here behind your wrangler and of course you can always mount an additional light way up high on top of that spare tire carrier as well we've got a great step pad right on the center of the bumper and down below you see it is compatible with a rear trailer hitch if your vehicle is equipped now finally here on the driver's side it does retain your license plate in a factory style location and it even reuses the led license plate light from your stock bumper now with that the other thing that i got to say i really like here is because the tire carrier is connected right to the tailgate it makes it really easy to access your cargo area you don't have to unlock and open the tire carrier first everything swings as one complete unit now that being said i do have one last item to add to the build here if you remember a few weeks ago we never installed those trim rings on the mats dual sport bora wheels well that's because i went ahead and had them sent out and painted to match for a great snazberry on top of Matt's build here just add that nice little accent that custom touch to really set his jeep out from the rest of the crowd now if you guys want to get more information about any of the items i installed on Matt's jeep over the past few weeks ranging from that two and a half inch dual sport suspension the bora wheels Mickey Thompson baja boss all-terrain tires those heavy-duty differential covers the RX stubby front bumper along with the 7000 series lights and Quadratec stealth series winch you can click that info button to head over to Quadratec.com as always if you guys have any comments or questions you can always use those for me down in the comment section below or contact us directly at any of the options on the screen and if you haven't already and you like these videos do me a huge favor go and hit that thumbs up button don't forget to hit that subscribe button as well so be sure to catch all of our latest videos i definitely have some more projects in store for Matt's jeep so you're going to want to stay tuned for that but until then guys i'm Rob i'll see you out on the trail for now i think i got a few bolts i got a torque
The AEV Rear Bumper for the Wrangler JL features aggressive styling, high clearance design and high strength construction that's made right here in the USA! The Bumper can be installed alone or with the RX Tire Carrier to bring along up to a 40" spare tire without putting any weight on the tailgate of your Wrangler. The bumper is compatible with all trim level Wranglers and factory back-up sensors, and has provisions to add additional rear facing lighting. In this video Rob installs the AEV Rear Bumper and RX Tire Carrier on Matt's JL Rubicon and finishes out the build by installing some custom painted to match wheel protection rings on the Borah Wheels in matching Snazzberry Pearl!
Shop Products in this video
6 results

Shop Brands in this video

Tags:
Comments