Hey Rob here for Quadratec.com. Today we're going to be installing the backbone system from Rhino-Rack on my Jeep Gladiator. While the backbone may not look like much from the exterior of your Jeep, once you have it installed it transforms the load carrying capacity of your Gladiator's hardtop. It acts as the base of your roof rack system allowing you to install crossbars or a Pioneer Platform in place so that you can bring along bikes, canoes, kayaks, recovery gear, really you're only limited to your imagination and 220 pounds of dynamic load up on top of your Jeep. Before you can start loading up the roof of your Gladiator with all those fun toys, we need to get back to the basics. The Backbone system is made up of four of these exterior castings that get mounted onto your hardtop and they bolt through the top to an interior structure. That's right, we are going to be drilling through the hardtop on our Jeep today, but I promise you it's actually a very painless install. Rhino-Rack has made it very easy providing all the templates you need so that there's no complicated measuring involved and they really give you the confidence to tackle this job in just a few hours at home. Again, if we take a look at the exterior castings here at the rear corner of our hardtop, this is bolted through the top to an interior structure that runs all the way down to the top of the body tub. It's bolted in place using two of the existing hardtop fasteners at the rear corner. The front casting again is bolted through the top to an interior casting that's sitting right on top of the roll bar and then it's bolted again through an existing mounting location in your roll bar. Both the roll bar and the body tub are very strong at these locations and more than capable of carrying some extra load, so you can see how with having those exterior castings transfer the load to the inside of the Jeep we're now no longer relying on the fiberglass top alone to carry the weight of anything we want to bring along with us. Now why don't we go ahead and back up just a few steps and I'll show you how I got the backbone system installed in my Jeep. The first thing I had to do is go ahead and unpack all of the components that come with the Rhino-Rack Backbone System. One of the things that I really love that Rhino-Rack does is give you this great cardboard template to lay everything out. It features full-size one-to-one line drawings of every component and piece of hardware in the Backbone kit. Not only does this ensure that you have everything and you're not missing any hardware before you start the job but it takes all the guesswork out of which hardware you need to use with which component because they even go as far as giving you dotted line drawings showing you where to use that hardware with that component. I love that Rhino-Rack is doing this because, let's face it, this job can be a bit intimidating. We are, after all, drilling into the hardtop on our Jeep and any mistakes we make could be very expensive, so taking as much guesswork out of this job as possible is definitely a great advantage that Rhino-Rack can give us with this template. Once you have everything laid out familiarize yourself with all of the different components. Of course we're going to need a few tools to do this job as well. We're going to need a tape measure, a marker and some masking tape. You're going to need your Jeep tool kit with the torx tools that came with your Gladiator. You're also going to need a few drill bits. These are pretty common drill bit sizes and you'll probably have them in a drill bit kit if you have one in your toolbox. We'll need a 1/4 inch drill bit, a 5/16 inch drill bit, as well as a 1/2 inch drill bit. Of course we're going to need a power drill, as well as some butyl mastic. Now if you're having a hard time finding butyl mastic like I was, I reached out to Rhino-Rack and the answer was pretty much what I expected it was going to be. Basically you want a sealant that's going to remain flexible over time. We are dealing with a rack on top of the Jeep that's going to have to endure vibrations carrying a load, so you don't want a sealant that's going to harden which could potentially crack over time and allow some leaks into your hardtop. I'm going to be using a silicone sealant that I picked up at my local hardware store. It's guaranteed to remain flexible. It also has some UV inhibitors in there as well as being protected from mold and mildew over time so it should be a perfect sealant to use where we're drilling holes in the hardtop. You're also going to need a vacuum to clean up the dust from the fiberglass and hey, because we are drilling into a fiberglass top it's probably a good idea to have a mask handy and I have a feeling everybody's got a mask right now. Now as you can see I already went ahead and I prepped my Gladiator for the install. I removed the freedom panels to let a little more light into the cab to make it easier to show you exactly what i'm doing and I went ahead and I removed my rear doors. Now of course that's not necessary but it is going to make it a little bit easier to reach in and out of the Jeep while i'm working and if you've got the space and a door cart or a door hanger like I do why not make the job a little bit easier on yourself. The first thing we need to do to go ahead and get started is to apply some masking tape to the exterior surfaces of the hardtop where we're going to be drilling. Once we have the masking tape on the hardtop we can move on to removing two of the hardtop bolts. We need to remove the two outermost bolts. One closest to the rear door and one along the backside edge farthest to the outside. Next we can grab the appropriate side rear casting. I'm going to be starting on the passenger side of the Gladiator here. We can set the casting in place on the rear of the hardtop and then we need to grab the spacer multi-tool. Now there's two different heights. There's an 11 millimeter side and a 6 and a half millimeter side. Taking the spacer multi tool, we want to set that right into the rain gutter on the hardtop with the 6 and a half millimeter side, the phillips head side, sitting in the rain gutter and that's going to give us the correct spacing for the height of this rear casting on the hardtop there. We go ahead and grab the rear casting spacer tool and you want to take that and simply bend it 90 degrees and we're going to rest these two little feet on the spacer into this channel on the back side of the hardtop. Now we can push this spacer as far forward without lifting it away from the hardtop and then slide the rear casting until the rear most point on the casting is touching that spacer. That's going to give us the correct location for our rear casting on the hardtop. Using one of the spacer bushings, set it in the rear casting so that you can center your drill bit and then drill your first hole using the 1/4 inch drill bit. Now that we've successfully drilled our first hole in the hardtop, the rest of them should be pretty easy. Go ahead and grab that spacer bushing again and drill our second hole in that rear casting again using that 1/4 inch drill bit. Now we can go ahead and remove the rear casting out of the way and enlarge both of those holes that we just made with the larger 5/16 inch drill bit. Now we can go ahead and remove our masking tape and apply sealant around both of the holes. Now we can set the rear casting into place on the hardtop and install the fasteners through the casting. Now we can move on to installing the passenger side rear uprights inside the hardtop. Slip the outside in first followed by the rear section. Align the tabs and secure it in place using the appropriate fasteners and washers and the included allen wrench. Then we need to install the two washers in between the hardtop and the interior uprights and secure the rear casting with two of the flange bolts. Using the multi-tool and your Jeep ratchet with the t50 torx bit go ahead and tighten both bolts on the rear casting simultaneously. It's important that you use your Jeep tool kit ratchet so that you don't over tighten the bolts. Then we can reinstall the factory hardtop retaining bolts. All right, at this point we've got our rear casting fully installed on the hardtop, it's time to move on to the front casting so you can go ahead and grab the appropriate side casting and set it in the general location here on the hardtop. We're going to be using the front spacer tool to get our correct distance for that front casting front to back on the hardtop. You do want to pay special attention to the larger hole on that spacer that it lines up with the mounting hole on that front casting. We're going to be using two of these M6 mounting bolts to secure that spacer in place. Now those do have some blue loctite on them, so we don't want to thread them all the way into the castings. Just get them started enough to hold that spacer. With the rear secured we can go ahead and slide the casting to line up with the hole in the spacer and we'll go ahead and start that second M6 bolt. You can see that we've got this larger hole lined up with the two holes there in that forward casting. Now again we're going to be using our Rhino-Rack multi tool just like we did for the rear casting. This time we're going to be using the larger 11 millimeter side, the flathead side, and again set it into the rain gutter and let that front casting rest right on the multi-tool. That'll locate it where it needs to go on top of the hardtop for us. At this point it's lined up where it needs to be and we can go ahead and grab one of those spacers just like we did with the rear casting. Set it in the mounting hole with the larger end up. That's just going to help align our drill bit perfectly centered in that mounting hole, then using that 1/4 inch drill bit we can go ahead and drill through the hardtop. Now the hardtop is two layers at this point so we don't want to go all the way through both layers. We only want to drill through that first layer of hardtop at this point. Once we get that, we'll come back and enlarge it with the second drill bit. Slide our spacer into place and then we can come back and drill through the second layer of hardtop. Before we can bolt in place we need to go ahead and slip our interior roll bar casting up over top of the roll bar and secure it with the bolt and washer through the existing hole in the roll bar. All right, with both the outer and inner holes enlarged to half of an inch we can go ahead and remove our masking tape and we can apply sealant around both of the holes. Once the interior casting is in place we can go ahead and grab the front casting along with two of the spacer bushings set it in place on the hardtop you want to ensure that those bushings drop through both holes that we've drilled through both the outside and the inner hole. Then we can secure the casting using the bolts with a metal washer first, followed by the rubber washer underneath the metal washer and then you want to tighten using the included allen key and the Rhino-Rack multi-tool to help you achieve the proper torque specification on the bolts. Once you have all the bolts tightened that takes care of half the install. You can go ahead and repeat those same steps on the opposite side of your Jeep to finish out your installation. Iif you guys want to get more information or to purchase a Rhino-Rack Backbone System for your 2020 or newer Jeep Gladiator JT, you can click that info button to head over to Quadatec.com. As always if you haven't already and you like these videos do me a huge favor, make sure you hit that thumbs up button and then don't forget to hit that subscribe button as well as the notification icon so be sure to catch our next video where I'm going to show you how to install a Rhino-Rack Pioneer Platform on top of the Backbone System and then load it up with some accessories. If you ever have any comments or questions about the Backbone or how to get it installed on your Jeep, you can always leave them for me in the comments section below or contact us directly at any of the options on the screen. Until next time I'm Rob, and I'll see you out on the trail!
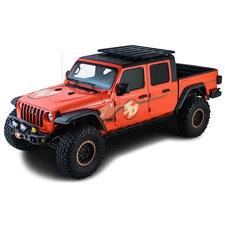
The Rhino-Rack Backbone Mounting System for the Jeep Gladiator JT is an interior and exterior structure that utilizes exterior mounting castings, connected to an internal frame that mounts to the Gladiator roll bar and body tub. The Backbone Mounting System transfers the load from your roof rack through the hardtop and to the internal frame allowing you to carry up to 100kg or 220lbs of gear on your Jeep Gladiator JT's roof! In this video, Rob will walk you through the installation steps to get the Rhino-Rack Backbone Mounting System installed on your Jeep Gladiator JT.
Shop Products in this video
4 results

Shop Brands in this video
Tags:
Comments