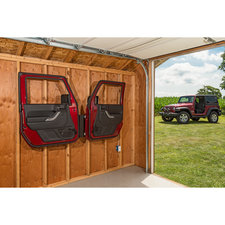
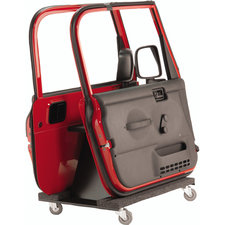
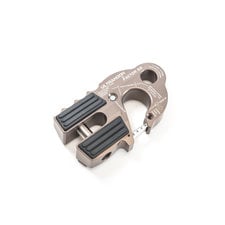
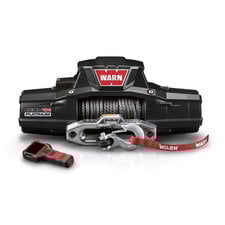
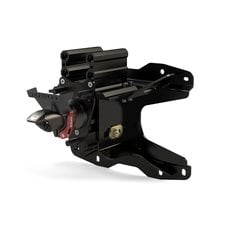
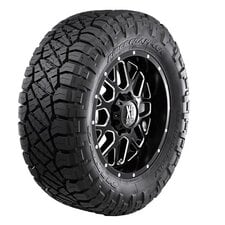
hey Rob here for Quadratec.com today I've got Tony's 392 back in the shop as you can see looking just a bit different than it did well before the weekend started Tony wasted no time at all beginning his long list of modifications he has in store for his new wrangler one of the first things he swapped out were those factory wheels and tires for a new set of 20 inch black rhino recon wheels and he wrapped a set of 38 by 1350 Nitto ridge grapplers around those wheels as you can see you can fit a 38 inch tire on a stock rubicon 392 with zero suspension modifications and absolutely no rubbing or clearance issues well at least for on-road use now with the increase in tire size he needed to change something out to carry his spare so he's installed a Teraflex alpha hd spare tire bracket and third brake light relocation bracket back there also when jumping from a 33 to a 38 inch tire with the increased ride height we wanted to make it a little easier to get in and out of his new jeep so we installed a set of rock slide engineering step sliders now finally up front he ditched the end caps on that steel bumper to give it that great stubby bumper look added a Mopar winch guard along with a worn xeon platinum 10s winch of course had to modify that worn logo to match the gold accents found around the 392 and finally finished off the front end with a factor 55 ultra hook now Tony has a lot more in store for this wrangler but we're not going to be doing any of the modifications today we're going to be checking out what's inside all of these boxes here that came packed in the back of his new wrangler if you order the dual door group from the factory this is just what you're going to get here your jeep is going to show up at the dealership with the full doors installed and your half doors along with the mirrors and all the uppers packed into the back of your wrangler so the first thing we need to do today is to go ahead and get these full doors off the jeep and then we can start unpacking all these boxes so I can walk you through step by step what goes into assembling installing and aligning your new half doors on your brand new wrangler now with our doors removed from the vehicle and our new half door is unpacked we're ready to begin our install if you're unsure of the steps on how to remove your full doors from your wrangler or your gladiator you can click that info button to watch a video we put together a while back in 2018 when the wrangler jail was first released of course when you're removing your doors from your vehicle you're going to want somewhere safe and secure to store them and that's where something like our door storage hanger or even our door storage cart is the perfect solution especially if you're going to have two sets of doors for your vehicle now you're going to want somewhere to safely and securely store whatever door is not installed currently on your wrangler one of the first steps I did after removing the doors was to go ahead and reinstall the mechanical check strap bolts here into our door jamb now our new factory half doors only rely on a webbing check strap like the older jeep wrangler TJs and JKs not a mechanical check strap in addition to that fabric check strap like our full doors do so by storing that bolt here in the door jamb we'll know exactly where it is when we're ready to reinstall our full doors onto your wrangler or gladiator later on down the road I went ahead and unpacked our driver side front door first this box was labeled as having the instructions included I've also got a few tools out here ready to go one of the things I can say about factory Mopar instructions is well these things are really designed for the install techs at the dealership who have training on how to read these they can be quite cryptic and hard to understand for the end user so I'm going to walk you through step by step what's involved in installing these the other thing about these instructions is well they get updated quite often in fact the ones that come out of the box may be different or may have been updated since they were packed at the factory I will say there are some interesting things that I saw when flipping through here as of right now at the time of filming this video you can only order the dual door group for the wrangler not the gladiator however these instructions well they list some very specific steps related specifically to the gladiator so I think that's good news for guys out there thinking about ordering a gladiator very soon hopefully jeep opens up that dual door group option for gladiators in addition to the wrangler or maybe this is planning here for jeep to release the doors as a jeep performance part an after the fact accessory that you can purchase for your wrangler or gladiator that you already own so I'm going to go ahead and set these aside for now some of the tools that I have out are a nylon panel tool an eight millimeter wrench a three millimeter allen wrench as well as a torque wrench and a t50 torx bit to go with that torque wrench in addition to that you're going to want your jeep tool kit that came with your vehicle with the ratchet and the t50 torx bit of course that's what we use to go ahead and remove our full doors from the jeep and we're going to be using this primarily for the install of our new half doors the first thing we need to do is go ahead and lift our door up set it in place here on the body side hinges
with the door now on the vehicle one of the first things I recommend you doing is go ahead and connect that check strap to the body side of the vehicle of course I'm working in a garage in a pretty controlled environment but if you're outside in the elements well you'd hate to have a gust of wind come up let this door get away from you potentially scratch or damage either the body of your wrangler gladiator or your brand new half doors so we can go ahead and start by unwrapping and removing that protective coating over the factory electrical connector and then we can go ahead and install that check strap right there onto the hook inside of the fender well at this point it's also a good time to go ahead and make our electrical connection here inside of the driver's side footwell just like with that full door you just want to go ahead and plug our new electrical connection in being sure to fully seat that folding down the white latch and then you can slide that red locking tab back into place if you like it's really not totally necessary we can also go ahead and reinstall the plastic trim cover over top of our electrical connector at this point now because our new half doors are part of the dual door group package they're going to retain all the same factory options and features that were in place on your full doors so if you have things like blind spot monitoring proximity entry and power locks well they're also going to be in place here on your factory half doors before you go and close your doors for the first time we need to check a couple things as far as alignment goes the first thing to be aware of is the location of the striker here in the door jamb and the latch on the door you want that striker to be right in the middle of that latch as we're sitting right now our door looks like it's a little low to the striker here in the jamb it's very important we do not make any changes to the location of the door striker or the body side of the door hinges those are all aligned at the factory with your full doors and if you make any changes to their location your full doors are no longer going to line up with the body of your wrangler when you go to reinstall them down the road it's very important that we only make changes here to the black unpainted t50 torx bolts on the door side part of the hinge here on our new half doors before we do that however you are going to want to go ahead and reinstall your door hinge pin retaining nuts into both the upper and lower hinge that's going to give us a nice solid foundation to work off of so that this hinge doesn't move once we loosen these bolts we can simply align that door get a nice even gap all the way around and align that striker right in the middle of our door latch now the factory recommends that you tighten these hinge pin retaining nuts to about six foot pounds so for me finger tight with the jeep tool kit ratchet and t50 torx bit is plenty we don't need to get out our torque wrench for those nuts now at this point we can start loosening these four black unpainted t50 torx bolts so that we can begin aligning our door
go ahead and just slightly loosen each bolt
and once you have some movement here in the door we may be able to go ahead and latch it
i like to loosen all four of them up
now at this point we can go ahead and make sure we've got that latch all the way closed that's going to center our door latch on the striker then we can adjust our gap all the way around to make sure we've got a nice even gap
and this is where it pays to take a little extra time get a really nice alignment on your door make sure that you're happy with how everything lines up all of our different body lines like from our cowl to our half door a nice even gap all the way around once you're happy with everything we can go ahead and snug these back up
now we can go ahead and test out our door
checking that we should be nice and centered the striker in the latch there
door opens and closes nicely now at this point the factory recommends 21 foot-pounds for these four bolts here on the hinges so for this I will recommend you grab yourself a torque wrench go ahead and set that to 21 foot-pounds and we'll just go ahead and make sure those are tightened
go ahead and fold out your mirror at this point we're ready to go ahead and install our uppers we can grab a nylon panel tool or even your jeep key slide it right in here into this opening in the filler plug and lift up to pop that plug out of place we also have one more right up here next to our mirror
i really like that jeep has gone as far as including these nice plugs to give the door a very finished look when you remove your upper windows you store these in the glove box or in the cargo area in the back when they're not in use we're ready to go ahead and install our upper into our door here
simply line up two pegs with the holes in the door and the first couple times you install these they're going to be pretty tight you might need to give them a nice little tap
get everything to line up and then again just like we did with the half door before you go and simply close the door you want to double check that everything looks like it's aligning properly close the door and the next thing we can do is check our weather seal for the upper now jeep recommends you use a good old dollar bill for this and I'll simply close the bill in the seal and if the build does not easily come out when you tug on it well then you know you've got a nice tight seal you want to check this in a couple spots around the door
make sure that you've got a nice tight seal if that's looking good the next step is to go ahead and open our window up
grab a flashlight and we can also check for any light leaks around that weather seal now if that dollar bill
now if that dollar bill slips right out of the upper or if you see light coming through that seal you do have some adjustment here in the uppers from the factory this is a new feature that we've never seen in a half door before on a TJ or a JK you pretty much had what you had with those old style uppers well now if we go ahead and remove the upper we do have some adjustments we can make to get a tighter or looser fit with our upper there's a three millimeter allen head bolt and an eight millimeter nut go ahead and hold the bolt steady while loosening the nut with your wrench then by turning this bolt counterclockwise it's going to bring the upper part of the door tighter to the body of the wrangler by turning it clockwise it's going to pull the upper portion of our upper farther away to give us a looser fit and once you have the made a couple adjustments go ahead and hold the bolt in place and retighten the nut and go ahead and recheck your fitment you can go ahead reinstall that upper into the half door and then you'll just want to come back and verify again with that dollar bill that you've got a nice tight weatherproof seal at this point we can go ahead and repeat the same basic procedures get our rear door installed now if you're still having any trouble getting your uppers aligned after making those adjustments to the posts well jeep does give you one other option they give you these small shims that have some double-sided tape on them you can install by putting them on the end of a pencil and then dropping them right down and sticking them to the bottom of those door slots I think there's one more change we can make here to complete the look of our half doors we can go ahead and remove the rear quarter window available with that one touch power top option and with that I think these new factory half doors look absolutely phenomenal on Tony's rubicon 392. now if you guys have any comments or questions at all about the dual door group option or how to get your new doors installed and aligned on your wrangler or your gladiator you can always leave this for me down in the comments section below or contact us directly at any of the options on the screen of course if you haven't already and you like these videos do me a huge favor go and hit that thumbs up button don't forget to hit that subscribe button as well as the notification icon so be sure to catch all our latest videos until next time I'm Rob I'll see you guys out on the trail but for now I'm going to go ahead and get those passenger doors installed so I have time to take this thing out for a little ride before Tony comes to pick it up
In today's video, Rob checks out the new mods Tony has already added to his Rubicon 392! 38" Nitto Ridge Grapplers wrapped around 20" Black Rhino Recon Wheels, Rock Slide Engineering Step Sliders, a Warn ZEON Platinum 10s winch & Factor 55 Ultra Hook and a Teraflex Spare Tire Carrier & 3rd Brake Light Relocation Bracket were the first new accessories added. After taking a look at Tony's improvements, Rob walks us through the step-by-step process of unpacking, installing & aligning the new half doors that came with the Dual Door Group Tony selected for his Wrangler Rubicon 392.
Watch as Rob walks us through getting the half doors set up and installed on Tony's Jeep.
Shop Products in this video
7 results

Shop Brands in this video


Tags:
Comments